Developer reference
MCP server: use Webcuris from an AI assistant
Connect Claude, ChatGPT, Cursor, Claude Code, VS Code or any MCP client to your account in a minute, step by step. Scan, read findings and export SBOMs from a conversation, with exactly your plan's abilities.
What this is, in plain words
AI assistants such as Claude, ChatGPT and Cursor can be given tools: things they are allowed to do on your behalf, like “start a scan” or “list my open findings”. The standard way to hand an assistant a set of tools is called the Model Context Protocol (MCP). Webcuris speaks it.
Once connected, you ask in ordinary words — “scan our website and tell me what to fix first” — and the assistant does the clicking: it starts the scan, waits for it, reads the findings and answers. You never type a command.
The assistant acts as you. It has your plan's abilities and nothing more: a Pro account's assistant can do what Pro can do, a Business account's assistant what Business can do. It cannot see other people's data, change settings, or touch billing. Everything it does appears in your audit log like anything you do yourself.
It is included in the Pro and Business plans. It is not part of the Free plan: a Free account that tries to connect is shown, on the approval page, that the feature is not included and where to change plan, and nothing is granted. A connection made on a paid plan stops working on its next request if the plan lapses. You do not need an API key: the assistant signs in through your Webcuris account, in your browser, and you approve it once.
Note
The only thing you will ever paste into an assistant is this address: https://webcuris.com/mcp
Before you start
Three things, all of which you probably have already.
- A Webcuris account on the Pro or Business plan. If you do not have one, create it at https://webcuris.com/signup and choose a plan under Account → Plan; the MCP server is not part of Free. Sign in once in your browser so the approval step is quick.
- The assistant you want to use, with a plan on *its* side that allows custom connectors (ChatGPT calls them plugins). Claude and ChatGPT require a paid plan for this; Claude Code, Cursor and VS Code do not. Each client's section below says what it needs.
- The server URL:
https://webcuris.com/mcp. Copy it exactly — https, no trailing slash. If you open it in a browser you land on the MCP page, which is how you know you have it right.
What happens when you connect
Every client follows the same three moments. You will recognise them whichever one you use.
1. You paste the address. The client contacts Webcuris, is told it needs permission, and works out on its own where to send you. Nothing to configure.
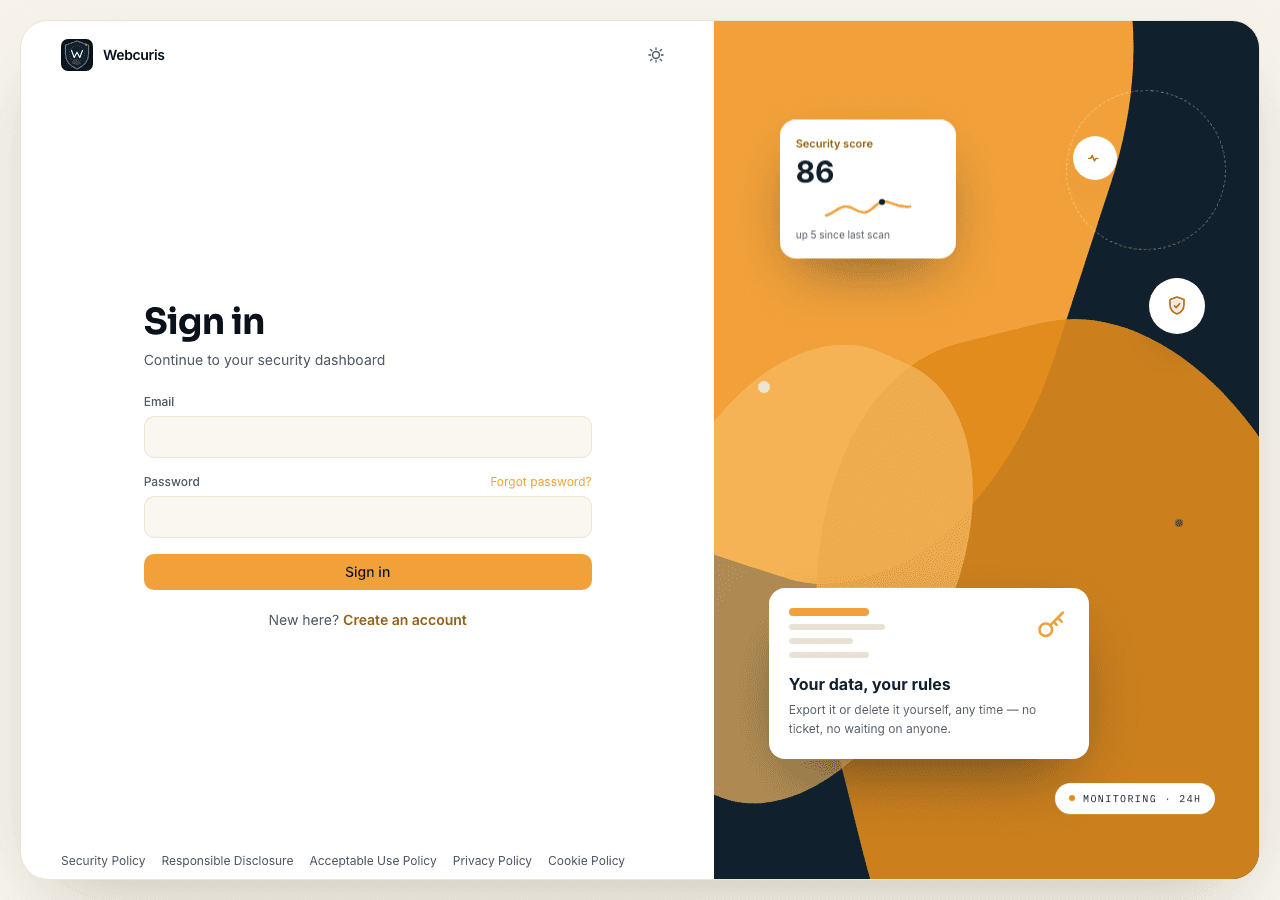
2. You sign in and approve, on Webcuris. The client opens a Webcuris tab in your browser. If you are not signed in, the ordinary sign-in page appears first; sign in with your usual email and password. Then you see the approval page: it names the client, lists exactly what it will be able to do, and shows where your browser will go afterwards. Press Allow. (Press Cancel and nothing is granted.)
3. You are sent back. A page says “Connected. Returning to …” and your browser returns to the client, which now shows Webcuris as connected. From then on the client holds a token that expires after an hour and renews itself for up to thirty days; your password is never given to it.
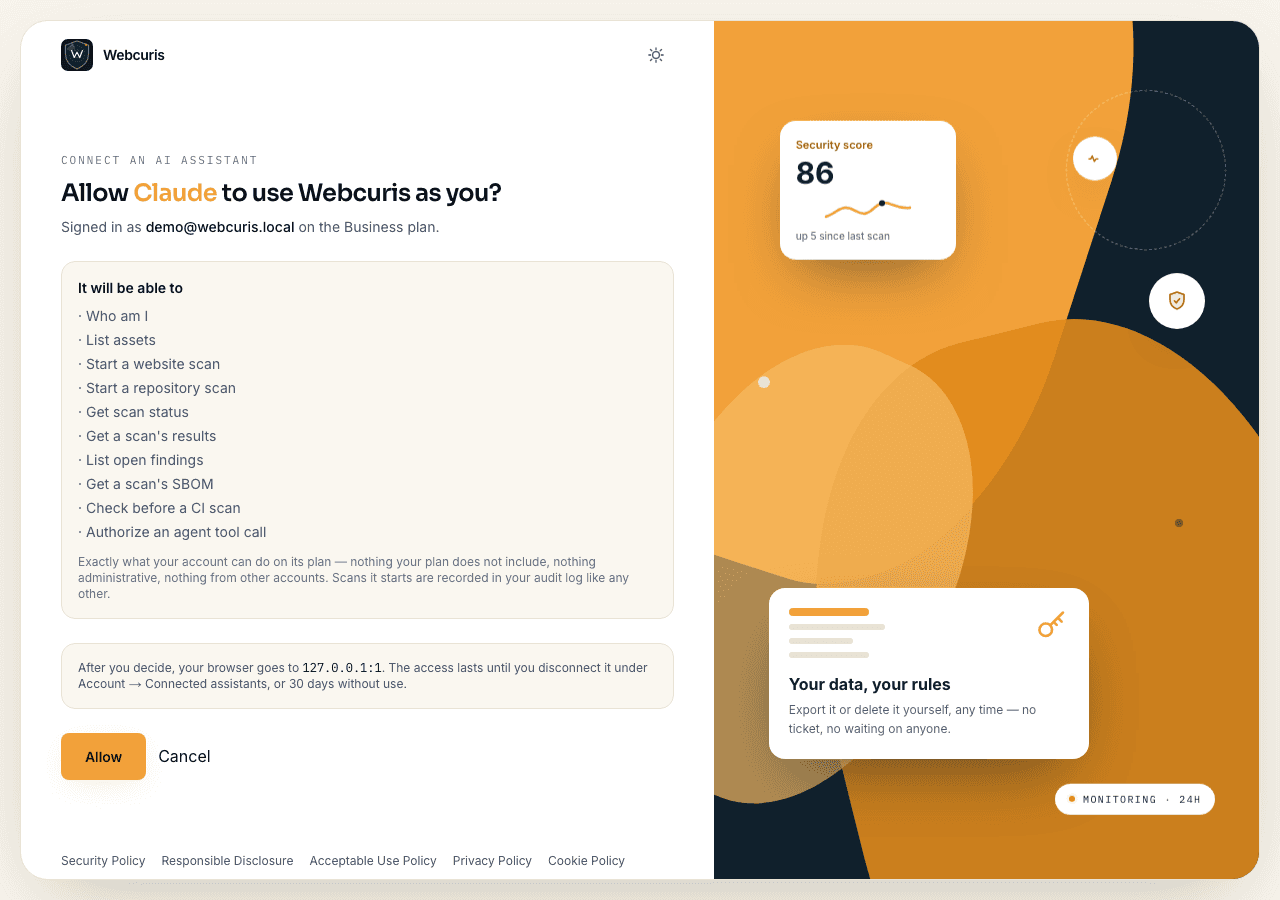
The approval page
This is the page that grants access, and the only place a decision is made. Read the three things it tells you: who is asking (the client's name, in orange), what it will be able to do (the ten tools, listed), and where your browser goes afterwards (the client's own address). If any of the three surprises you, press Cancel.
The client's name and its return address come from the client's own registration, and a request whose address does not exactly match what it registered is refused before this page is shown.
After Allow
A short confirmation, then your browser returns to the client on its own. If it does not within a few seconds, the page has a link to continue. You can close the tab afterwards; the client, not the tab, holds the connection.

Claude: connect
Claude — claude.ai in the browser, and the Claude desktop app. Where the setting lives: Settings → Connectors → Add custom connector. It signs in through your Webcuris account; there is no key to paste anywhere.
The server URL for every step below is https://webcuris.com/mcp.
Custom connectors are available on paid Claude plans (Pro, Max, Team, Enterprise). On Team and Enterprise an owner may need to enable custom connectors under organisation settings first.
- Open claude.ai (or the Claude desktop app) and sign in. Click your initials in the bottom-left corner, then Settings.
- In the left column of Settings, click Connectors. Scroll to the bottom of the list and click Add custom connector.
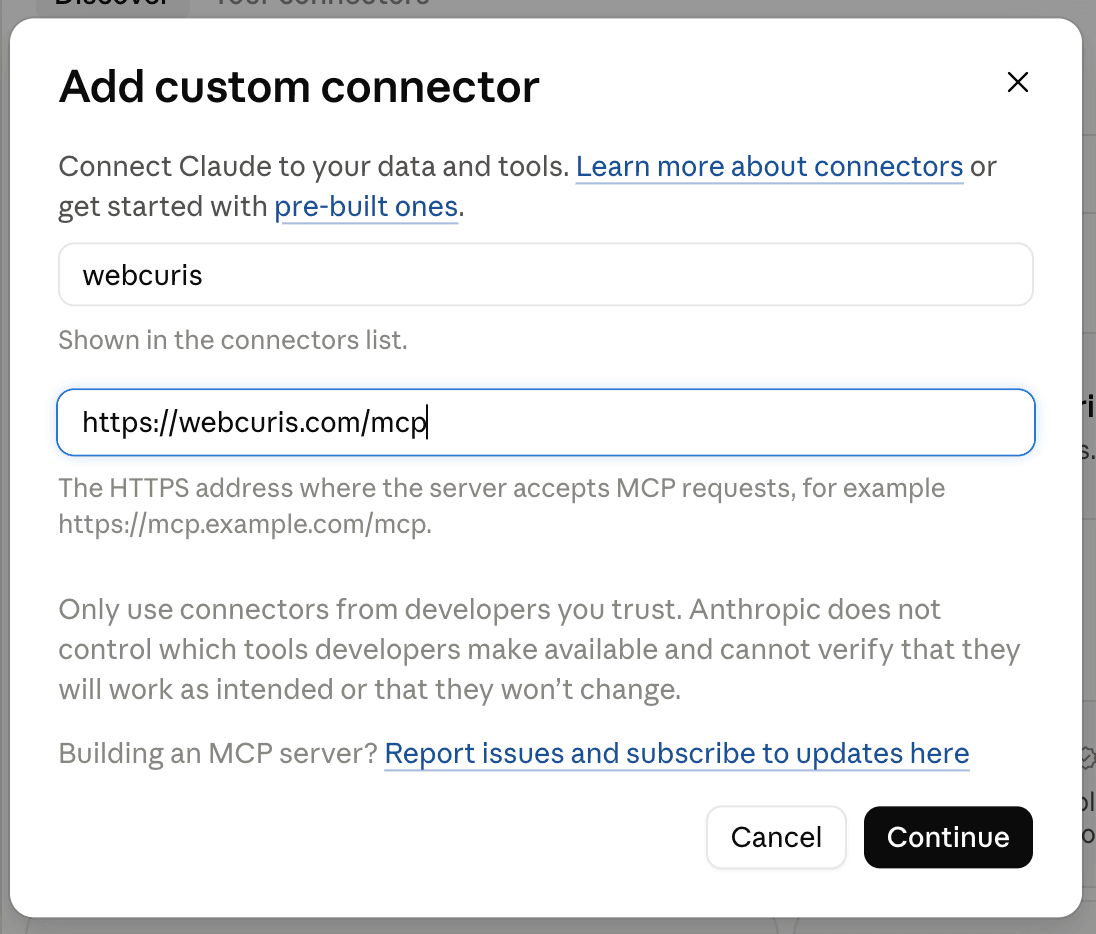
- A form opens with two boxes, neither of them labelled. The first is the name shown in your connectors list — type
Webcuris. The second is the server address — paste exactly this:https://webcuris.com/mcp - Click Continue. Webcuris now appears in the Connectors list with a Connect button next to it. Click Connect.
- A new browser tab opens on Webcuris. If you are not signed in, the sign-in page appears first; sign in with your usual Webcuris email and password. You then see a page titled Allow Claude to use Webcuris as you? listing what Claude will be able to do.
- Click Allow. The tab says the connection is complete and returns you to Claude. In the Connectors list, Webcuris now shows Connected.
- Start a new chat. Click the + (or the sliders icon) at the bottom of the message box, open Connectors, and make sure Webcuris is switched on for this chat.
Claude: check that it works, and if it does not
Do this once, right after connecting. It takes a minute and tells you the connection is yours.
- Type: “Use Webcuris to tell me which account I am signed in as and what my plan includes.” Claude asks permission to use the Webcuris tool the first time; approve it.
- The answer names your email address and your plan. That proves the connection is yours and reads the same account you see in the browser.
- Then try: “Scan example.com with Webcuris and list the three most important findings.” Claude starts a scan, waits for it, and summarises the results.
Note
There is no “Add custom connector” button. Your Claude plan does not include custom connectors, or an organisation admin has turned them off. Check your Claude plan in Settings → Billing. · Claude says it cannot reach the server. Check the URL is exactly https://webcuris.com/mcp with https and no trailing slash. Open it in a browser: you should be redirected to the Webcuris MCP page, which proves the address is right. · Claude answers but says the tool is not available in this chat. Connectors are switched on per chat. Click + in the message box, open Connectors, and switch Webcuris on.
Claude Code: connect
Claude Code — the terminal agent. Where the setting lives: one command in the terminal, then /mcp. It signs in through your Webcuris account, or takes an API key on a plan that includes one.
The server URL for every step below is https://webcuris.com/mcp.
An API key acts as you, with your role, exactly like the CLI. Keys are created under Account → API keys on plans that include them, and are shown only once.
- Open a terminal. Check Claude Code is installed by running
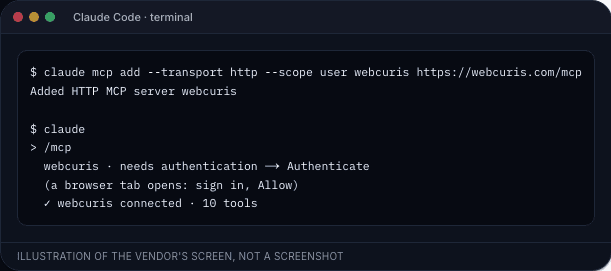
claude --version; if it is not, install it first from Anthropic's documentation. - Run the command shown below, exactly as written. It registers the server under the name
webcurisfor every project on your machine (that is what--scope userdoes). It prints “Added HTTP MCP server webcuris”. - Start Claude Code by running
claudeinside any project folder. - Type
/mcpand press Enter. A list of servers appears;webcurisis marked as needing authentication. Select it and choose Authenticate. - Your default browser opens on Webcuris. Sign in if you are asked to, then on the page Allow Claude Code to use Webcuris as you? click Allow. The browser tab says the connection is complete.
- Back in the terminal,
/mcpnow showswebcurisas connected with ten tools. Press Escape to close the list.
# Add the server (run once)
claude mcp add --transport http --scope user webcuris https://webcuris.com/mcp

# Instead of signing in through the browser, on a plan that includes API keys
claude mcp add --transport http --scope user webcuris https://webcuris.com/mcp \
  --header "Authorization: Bearer wsm_paste_your_key_here"
Claude Code: check that it works, and if it does not
Do this once, right after connecting. It takes a minute and tells you the connection is yours.
- Type: “Use Webcuris to tell me which account I am signed in as and what my plan includes.” Claude Code asks whether it may use the whoami tool; allow it. The answer names your email and plan.
- Run
claude mcp listfrom any terminal. Webcuris shows as connected, with the URL you added. - The connection is remembered. You will not be asked to sign in again unless you disconnect it from your Webcuris account page or the 30-day refresh token expires.
Note
/mcp says the server failed to connect. Run claude mcp get webcuris and check the URL is https://webcuris.com/mcp. Remove and re-add it with claude mcp remove webcuris followed by the add command. · The browser opened but nothing happened after Allow. Return to the terminal; the connection completes there, not in the browser. If /mcp still says it needs authentication, choose Authenticate again — the first code may have expired (they last ten minutes). · It says the tool is not included on my plan. That is the same answer the web app gives: the assistant has your plan's abilities and nothing more. The message names the plan that includes it.
# What a working connection looks like (real output of claude mcp list)
$ claude mcp list
Checking MCP server health…

webcuris: https://webcuris.com/mcp (HTTP) - ✔ Connected
ChatGPT: connect
ChatGPT — chatgpt.com and the ChatGPT desktop apps. Where the setting lives: Settings → Security and login → Developer mode, then Plugins → +. It signs in through your Webcuris account; there is no key to paste anywhere.
The server URL for every step below is https://webcuris.com/mcp.
Developer mode and custom MCP plugins need a paid ChatGPT plan (Plus, Pro, Business, Enterprise or Edu). On Business and Enterprise workspaces an administrator may have to allow them first. ChatGPT only accepts OAuth for custom servers, which is why Webcuris provides it.
- Open chatgpt.com and sign in. Click your profile picture in the bottom-left, then Settings.
- Click Security and login and switch Developer mode on. Custom MCP plugins are only offered with it on.
- Open the Plugins page (in the left sidebar, or from Settings; ChatGPT called this page Connectors before July 2026). Click the + button to create a plugin.
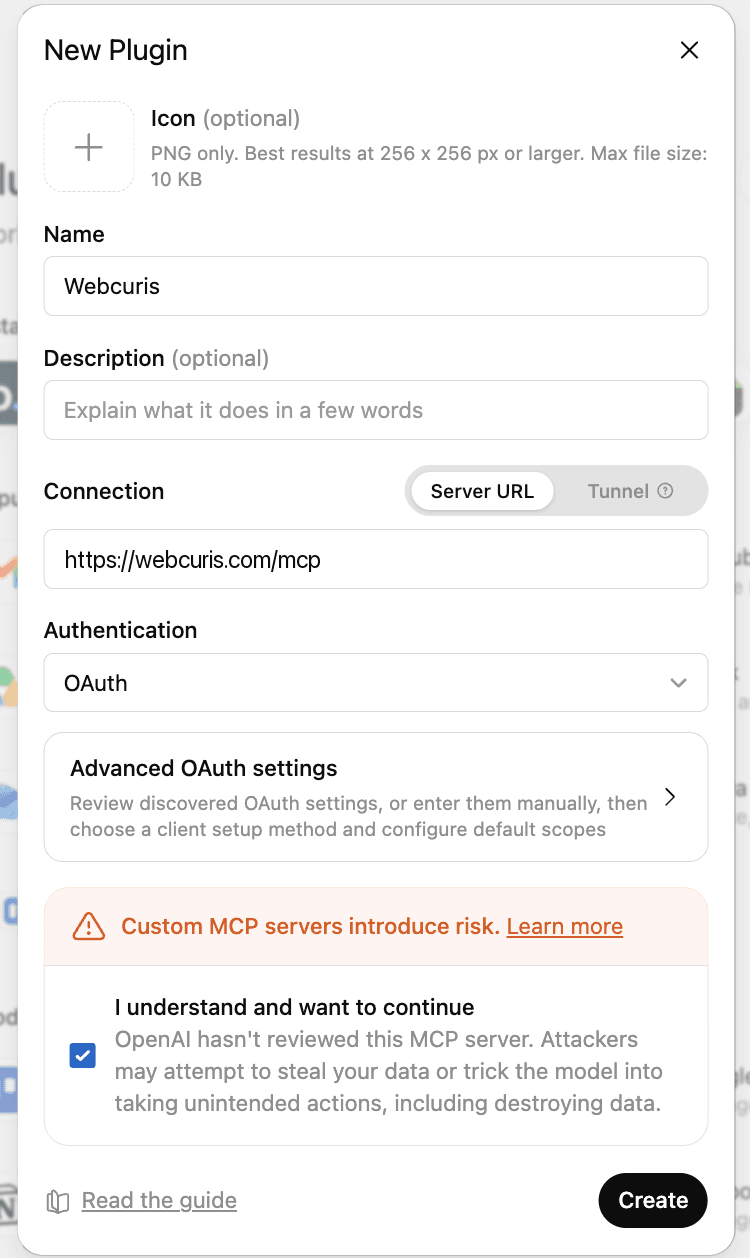
- The New Plugin form opens. Leave Icon empty. Name:
Webcuris. Description (optional): for exampleSecurity scans and findings. Connection: keep Server URL selected (not Tunnel) and paste exactlyhttps://webcuris.com/mcp. Authentication: OAuth. Leave Advanced OAuth settings alone — ChatGPT discovers them from the server. Tick I understand and want to continue under the risk notice, then click Create. - ChatGPT sends you to Webcuris in a new tab. Sign in if you are asked to, then on the page Allow ChatGPT to use Webcuris as you? click Allow. You are returned to ChatGPT and Webcuris appears among your plugins; if it shows a +, click it to install the plugin for your account.
- Start a new chat. Click the + button in the message box, choose Developer mode, and tick Webcuris so it is available in this conversation. In a Work chat you can also type
@in the message box and pick Webcuris.
ChatGPT: check that it works, and if it does not
Do this once, right after connecting. It takes a minute and tells you the connection is yours.
- Type: “Use Webcuris to tell me which account I am signed in as and what my plan includes.” ChatGPT shows the tool it is about to call; confirm it. The answer names your email and plan.
- Then try: “Use the Webcuris plugin to scan example.com and summarise the top findings.” Starting a scan is a write action, so ChatGPT shows the request and asks you to confirm it once; approve, and it starts the scan, waits, and summarises.
Note
There is no + button, or no Plugins page. Developer mode is off. Settings → Security and login → Developer mode. · ChatGPT says the server's OAuth configuration could not be found. Check the URL is exactly https://webcuris.com/mcp. ChatGPT reads the sign-in details from the server itself; a typo in the address is the usual cause. · Webcuris is installed but ChatGPT never uses it. It has to be enabled per conversation: + → Developer mode → tick Webcuris. Or name it: “Use the Webcuris plugin to …”. · It asks me to confirm a block of JSON before scanning. That is ChatGPT's own confirmation for write actions, shown by default. Check the url field is the site you meant and confirm; reads such as listing findings do not ask.
Cursor: connect
Cursor — the AI code editor. Where the setting lives: Cursor Settings → Tools & MCP, or ~/.cursor/mcp.json. It signs in through your Webcuris account, or takes an API key on a plan that includes one.
The server URL for every step below is https://webcuris.com/mcp.
- Open Cursor. Open its settings with Cmd+Shift+J on a Mac or Ctrl+Shift+J on Windows and Linux (or the gear icon in the top-right, then Cursor Settings).
- Click Tools & MCP in the left column (older versions call it MCP). Click Add new MCP server or New MCP Server. Cursor opens a file called
mcp.jsonin the editor. - Replace the file's contents with the JSON shown below, save it, and close the tab. The only value that matters is the URL:
https://webcuris.com/mcp. - Back in Tools & MCP, Webcuris is listed with a status of Needs login or Needs authentication. Click it (or the Login link next to it).
- Your browser opens on Webcuris. Sign in if you are asked to, then on the page Allow Cursor to use Webcuris as you? click Allow. Return to Cursor.
- The entry now shows a green dot and lists the ten tools. Open the chat panel (Cmd+L / Ctrl+L), make sure Agent mode is selected, and ask.
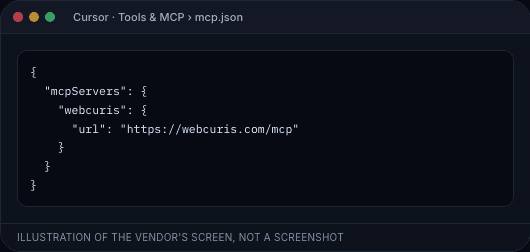
# ~/.cursor/mcp.json (every project) or .cursor/mcp.json in one project
{
  "mcpServers": {
    "webcuris": {
      "url": "https://webcuris.com/mcp"
    }
  }
}

# Instead of signing in through the browser, on a plan that includes API keys
{
  "mcpServers": {
    "webcuris": {
      "url": "https://webcuris.com/mcp",
      "headers": { "Authorization": "Bearer wsm_paste_your_key_here" }
    }
  }
}
Cursor: check that it works, and if it does not
Do this once, right after connecting. It takes a minute and tells you the connection is yours.
- Type in the chat: “Use Webcuris to tell me which account I am signed in as and what my plan includes.” Cursor shows the tool call and asks you to run it; approve. The answer names your email and plan.
- Then, with a project open: “Use Webcuris to scan the GitHub repository for this project and list any hard-coded secrets.”
Note
The server shows a red dot. Hover the dot to read the error. Usually the JSON has a typo: check the URL is exactly https://webcuris.com/mcp and the file is valid JSON (no trailing commas). · The Login link does nothing. Toggle the server off and on in Tools & MCP, then click Login again. If a browser tab opened earlier and you closed it, the pending authorization expired after ten minutes. · Cursor sees the tools but says it will not call them. Tool calls only run in Agent mode. Switch the chat mode from Ask to Agent.
VS Code: connect
VS Code — GitHub Copilot Chat, agent mode. Where the setting lives: .vscode/mcp.json in the workspace, or the MCP: Add Server command. It signs in through your Webcuris account, or takes an API key on a plan that includes one.
The server URL for every step below is https://webcuris.com/mcp.
- Open VS Code with the GitHub Copilot Chat extension installed and signed in.
- Press Cmd+Shift+P (Mac) or Ctrl+Shift+P (Windows, Linux) and run MCP: Add Server. Choose HTTP (HTTP or Server-Sent Events).
- When asked for the server URL, paste
https://webcuris.com/mcpand press Enter. When asked for a name, typewebcuris. Choose whether to save it for this workspace or for you globally. - VS Code writes the JSON shown below into
.vscode/mcp.json(or your user settings) and starts the server. A notification asks to allow authentication with Webcuris; click Allow. - Your browser opens on Webcuris. Sign in if you are asked to, then on the page Allow VS Code to use Webcuris as you? click Allow. VS Code shows the server as running.
- Open Copilot Chat, switch the mode to Agent, click the Tools icon in the chat box, and confirm the Webcuris tools are ticked.
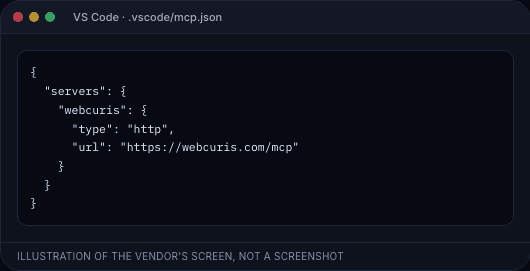
# .vscode/mcp.json
{
  "servers": {
    "webcuris": {
      "type": "http",
      "url": "https://webcuris.com/mcp"
    }
  }
}
VS Code: check that it works, and if it does not
Do this once, right after connecting. It takes a minute and tells you the connection is yours.
- Type: “Use Webcuris to tell me which account I am signed in as and what my plan includes.” VS Code asks you to confirm the tool call; continue. The answer names your email and plan.
- The MCP: List Servers command shows webcuris as running, with the tools it exposes.
Note
The server starts but the sign-in prompt never appears. Run MCP: List Servers, pick webcuris, and choose Restart. The authentication prompt is shown on start. · Copilot says it has no tools. MCP tools are only used in Agent mode, and the server must be started (MCP: List Servers → Start).
Any other MCP client: connect
Any other MCP client — Windsurf, Gemini CLI, Codex, Zed, your own agent. Where the setting lives: wherever the client adds a remote (HTTP) MCP server. It signs in through your Webcuris account, or takes an API key on a plan that includes one.
The server URL for every step below is https://webcuris.com/mcp.
- In the client's settings find where remote MCP servers are added. It may be called MCP servers, Connectors, Tools or Integrations.
- Add a server of type HTTP (also called Streamable HTTP or remote). Do not choose SSE or stdio. The URL is
https://webcuris.com/mcp; name itwebcuris. - If the client supports OAuth for remote servers (most current ones do), it discovers Webcuris's sign-in on its own and opens your browser. Sign in if you are asked to and click Allow. Nothing else needs configuring.
- If the client can only send a fixed header, create an API key under Account → API keys (on a plan that includes keys) and add the header
Authorization: Bearer wsm_…to the server's configuration.
# What a client does first, if you want to see it work from a terminal
curl -si -X POST https://webcuris.com/mcp -H 'content-type: application/json' \
  -d '{"jsonrpc":"2.0","id":1,"method":"initialize","params":{}}' | head -2
# HTTP/2 401
# www-authenticate: Bearer realm="Webcuris MCP", resource_metadata="…/.well-known/oauth-protected-resource/mcp"
Any other MCP client: check that it works, and if it does not
Do this once, right after connecting. It takes a minute and tells you the connection is yours.
- Ask: “Use Webcuris to tell me which account I am signed in as and what my plan includes.” The answer names your email and plan.
- If the client has a tools list, it shows ten tools starting with whoami and list_assets.
Note
The client asks for a client ID and client secret. Leave them empty or choose “dynamic registration”: Webcuris registers clients automatically and does not use secrets. If the client insists on values, it does not support OAuth 2.1 dynamic registration; use an API key instead. · The client only offers SSE. Webcuris serves Streamable HTTP, the current MCP transport, and has no SSE endpoint. Update the client, or use one that supports HTTP servers.
Testing the connection properly
Whatever the client, the first question to ask is the same: “Use Webcuris to tell me which account I am signed in as and what my plan includes.” The assistant calls the whoami tool and answers with your email address, your role and your plan, including what the plan does not include. If the email is yours, the connection is yours.
Then work through the checks below in order. Each one exercises a different part of the connection, and each one has an expected result, so you know whether what you see is right.
- Reading. “List my assets with Webcuris.” Expected: the websites and repositories you see on your dashboard, with the latest scan's score. On a new account: a message that there are none yet.
- Scanning. “Scan example.com with Webcuris and summarise the top findings.” Expected: the assistant says a scan has started, waits (polling the status every few seconds), then summarises. The scan appears on your dashboard exactly like one you started in the browser.
- Plan boundaries. “Run a deep scan of example.com.” Expected: a refusal explaining that a deep scan needs proven ownership of the domain. Then ask for something your plan does not include, for example a white-label report on Pro. Expected: the same explanation the web app shows, naming the plan that includes it. The assistant is not allowed to go around either.
- Someone else's data. Ask for a scan by an id you do not own (make one up). Expected: “not found”. An assistant cannot read a scan you cannot open in the browser.
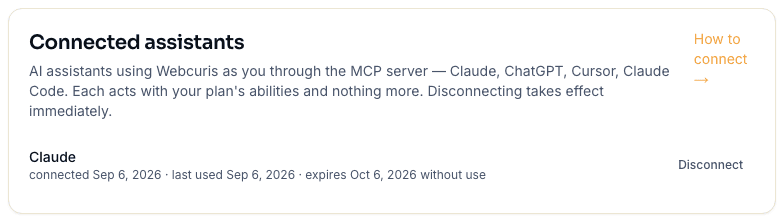
- The record. Open Account → Connected assistants. Expected: the client listed with “last used” a moment ago. Open Audit log. Expected: the connection approval, and the scan the assistant started, recorded like any other.
- Disconnecting. Press Disconnect next to the client, then ask it something. Expected: the client says it is no longer authorised and offers to sign in again. Reconnecting takes the same Allow as before.
API keys: when you need one and how to get one
You do not need an API key to connect an assistant: every client in this manual signs in through your account. A key is for two situations only: a client that cannot open a browser to sign in (a script, a CI job, a client that only takes a fixed header), or a connection you want to work without a person present.
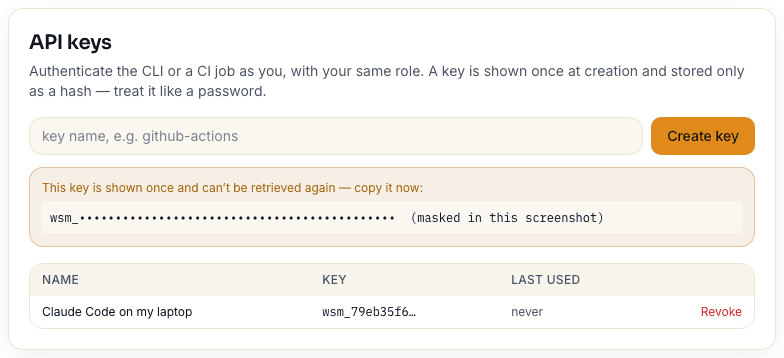
API keys are included on plans with API access (see Pricing). A key acts as you, with your role, so it is treated like a password: shown once when created, stored only as a hash, and revocable at any time.
- Open Account and scroll to API keys. If the card says the feature is not included on your plan, that is the answer: use the sign-in flow instead, or change plan.
- Type a name that says where the key will live, for example
Claude Code on my laptop, and press Create key. - The key is shown once, in an orange box that starts with
wsm_. Copy it now. When you leave the page it cannot be shown again — only its first characters. - Paste it where the client wants a header:
Authorization: Bearer wsm_…. Claude Code takes it as--header "Authorization: Bearer wsm_…"on the add command; Cursor takes it in theheadersobject of mcp.json. The exact lines are in each client's section above. - If a key leaks, press Revoke next to it. Whatever used it stops working on its next request.
What this does not do
A key does not raise a plan's limits and does not bypass ownership checks. It is the same you, signed in a different way.
The tools
Ten tools. The assistant chooses among them from your question; you never name them. Each returns text a model can read and a structured copy of the same data.
- whoami — the account the connection acts for: email, role, plan, limits, and which capabilities the plan does not include. Assistants call this first when unsure what is possible.
- list_assets — the websites and repositories on the account, with verification and monitoring state and the latest scan's status and score.
- start_website_scan (url, deep) — the standard passive assessment.
deepneeds proven ownership of the domain and is refused otherwise. - start_repository_scan (github_repository, branch) — dependencies across 8 ecosystems, secrets including history, container and infrastructure config, code patterns, AI usage risk.
- get_scan_status (scan_id) — queued, running, completed or failed, with progress.
- get_scan (scan_id, max_findings) — score, category scores and every finding with severity, confidence, evidence and the fix, most severe first.
- list_open_findings (severity, asset_hostname, limit) — every open finding across the account's assets.
- get_sbom (scan_id) — the CycloneDX bill of materials for a repository scan.
- scan_preflight (project_name) — whether a CI scan for that project would be accepted under the plan and quota.
- authorize_agent_action (session_id, tool_name, agent_name, allowed_tools) — the advisory runtime checkpoint for your own agents, recorded in the tamper-evident event log.
What this does not do
Nothing administrative is exposed: no user, organization, billing, settings or deletion tools. Evidence quoted in findings comes from the scanned target and is untrusted content; the tool descriptions tell the assistant to read it, not follow it.
What an assistant can and cannot do
The connection acts as you, with your role. A viewer's assistant reads; an admin's assistant can start scans. On an organization account the assistant sees what you see.
Asking for something the plan does not include — a repository past the plan's limit, a white-label report on Pro — returns the same explanation the web app shows, with the plan that adds it. Nothing is silently downgraded and nothing is silently allowed.
The whole feature is plan-gated as well. On the Free plan the approval page refuses the connection and nothing is granted; if a paid plan lapses, every existing connection is refused on its next request with the reason, and works again the moment the plan does.
Scans an assistant starts count exactly like scans you start: same quotas, same ownership requirement for deep scans, same refusal to touch private addresses or systems you have not registered.
Managing connections
Account → Connected assistants lists every active connection with the client's name, when it was granted and when it was last used. Disconnect revokes the connection immediately: its access token and refresh token stop working on the next request, and the assistant will ask you to sign in again.
Each connection is logged. Approving or declining a client appears in your audit log as an MCP connection event with the client's name and the address it registered.
Erasing your account deletes every connection and pending authorization along with everything else.
Security guarantees
Each line is enforced by the server. The commands after them show the first two from a terminal.
- OAuth 2.1 only: authorization code with PKCE (S256), public clients, no implicit or password grants. A request without a code challenge is refused.
- Exact redirect matching against the client's registration. HTTPS, loopback HTTP and custom app schemes only; javascript:, data: and file: are refused at registration.
- Tokens are bound to this server's address (RFC 8707 resource indicator) and stored only as SHA-256 hashes. A database copy cannot be replayed.
- Access tokens live one hour. Refresh tokens rotate on every use; reusing an old one revokes the whole family.
- Authorization codes are single-use for ten minutes. Replaying a used code revokes the tokens it was exchanged for.
- The consent form is verified by origin and re-validates every parameter server-side; nothing the client sent is trusted after the browser round trip.
- Per-user rate limit on the MCP endpoint, per-address limits on registration and token exchange, a 256 KB body cap, batches refused, session-less transport.
- Tools reuse the product's handlers, so the SSRF refusal, ownership checks, plan gates and audit apply without a second implementation to keep in sync.
curl -si -X POST https://webcuris.com/mcp -H 'content-type: application/json' \
  -d '{"jsonrpc":"2.0","id":1,"method":"initialize","params":{}}' | head -3
# HTTP/2 401
# www-authenticate: Bearer realm="Webcuris MCP", resource_metadata="https://webcuris.com/.well-known/oauth-protected-resource/mcp"

curl -s https://webcuris.com/.well-known/oauth-authorization-server
# {"issuer":"https://webcuris.com","authorization_endpoint":".../oauth/authorize",
#  "token_endpoint":".../oauth/token","registration_endpoint":".../oauth/register",
#  "code_challenge_methods_supported":["S256"],"scopes_supported":["mcp"], …}